The Menin Gate
In Memory of British & Commonwealth troops who fought and died during the First World War in
The Ypres Salient
The Ypres Salient
1914-1918
‘They march tonight’ said the Man-at-Arms,
With the moon on the Menin gate.
They march when the midnight bids them go.
With their rifles slung and their pipes aglow,
Along the roads, the roads they know,
The roads to the Menin gate. [Anon]
Every night at 8pm in Ypres the traffic stops at the Menin Gate.
The City of Ypres lies at the centre of an area known as the Ypres Salient. It is here that each night members of the local Fire Brigade parade and sound the Last Post (a British Infantry Bugle Call) under the arches of the great memorial to British and Commonwealth troops of the First World War.
This has been carried out without interruption since 1929 (except for the period of German occupation during World War Two) in remembrance of the British and Commonwealth troops who fell in the First World War.
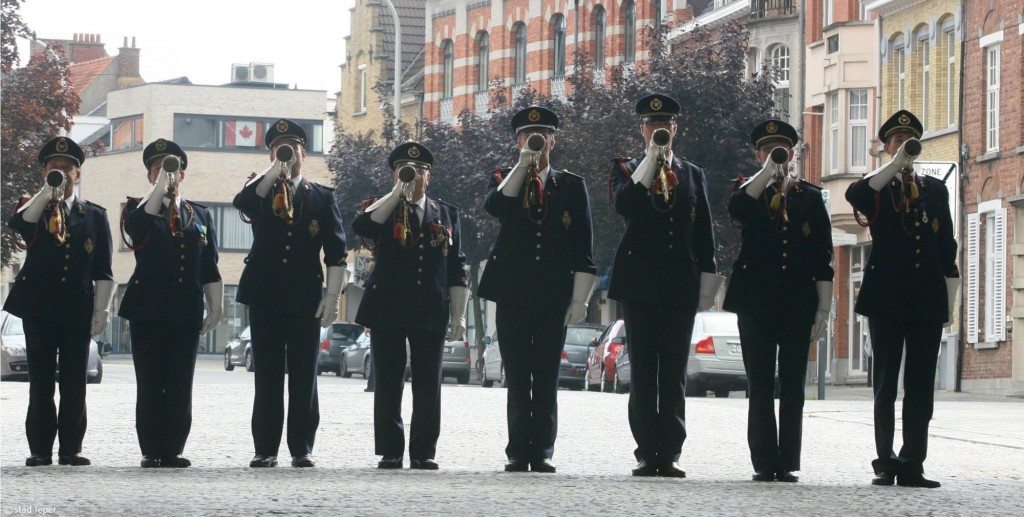
Members of the Ypres Fire Brigade sound Last Post
The people of Ypres have never forgotten the loss of civilian and military life in Ypres and the Ypres Salient. As you stand in the main square of Ypres today and survey the ornate buildings around you it is hard to believe that the whole area was razed to the ground during the war and then later completely rebuilt. It took until 1935 to rebuild the Cathedral and the Cloth Hall.

The Cloth Hall and Cathedral in Ypres today
Ypres, or to use more correctly the local Flemish tongue, Ieper (or “Wipers” as the British troops humouressly called it) was the centre for much of the British and Commonwealth effort in the First World War. It is situated in an area referred to as Flanders which is a centuries old word meaning flooded land.
The town itself sits on a wet plain astride a complex of waterways designed to drain the surrounding land. Beyond that, running in a broad sweep clockwise around Ypres from Passchendale in the north-east via Messines in the south to beyond Kemmel in the south west is a low ridge that puts the town at the centre of a natural amphitheatre.
Essentially, during WWI the Germans occupied the ridge surrounding Ypres and could observe everything that moved in the Ypres Salient forcing the allies to move troops usually only by night.
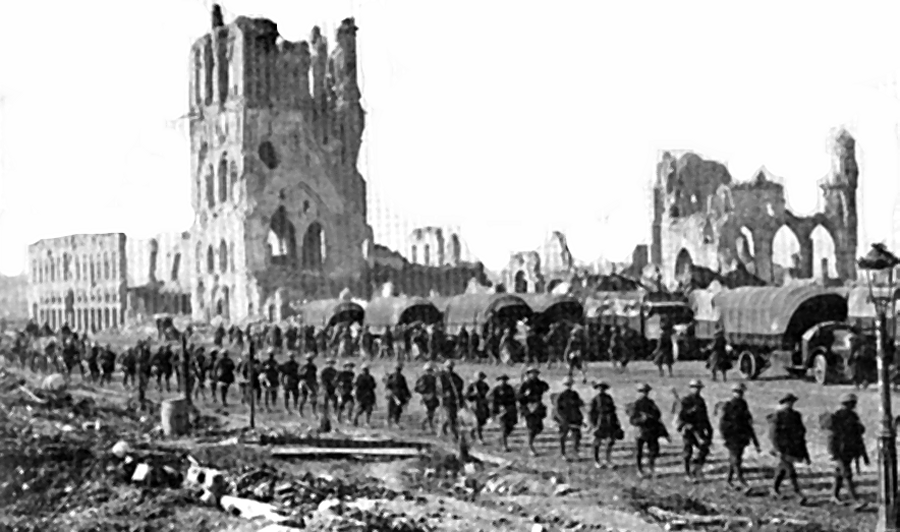
Troops march past the remains of the Cloth Hall on their way to the Menin Gate during WW1
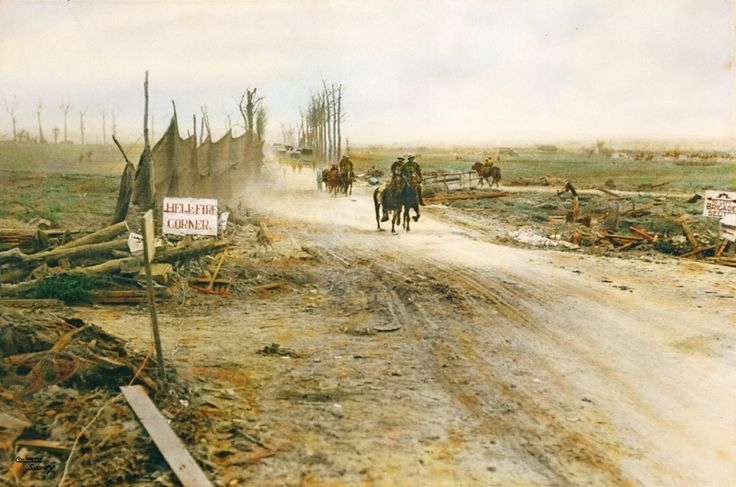
For four years the British and their allies tried to force their way up onto the ridge while the Germans attempted, equally as hard, to capture the town of Ypres. The fighting was continuous, the result was death and destruction with the town of Ypres being reduced to rubble. The magnitude of the losses were so great that the Salient has numerous British and Commonwealth Cemeteries including Tyne Cot which is the largest such cemetery in the world.
During the battle of Messines in April 1918, the German forces attacked and captured Messines making the British situation so desperate that Field Marshal Sir Douglas Haig, Commander-in-Chief of the British Expeditionary Force, issued his famous order: “There must be no retirement. With our backs to the wall and believing in the justice of our cause each one must fight on to the end.”
Ypres is an increasingly popular destination for British people who wish to learn more about what their fore-fathers endured during the First World War.
The town of Ypres is very welcoming to such tourists and has numerous exhibitions that keep alive the memories of the ordeal of the First World War; the nightly ceremony of Last Post at the Menin Gate being just one example.
The town has an abundance of good restaurants and hotels.
Holding Ypres was Vital
So why did the allies decide that they needed to hold the town of Ypres so desperately and seemingly at whatever the cost in human life? In pure military terms, taking account of the terrain, it was not a suitable defensive position.
Much of the answer to this lies in the understanding of the core strategies employed by both sides which, in turn, resulted from some of the national alliances that had developed over the previous decades.
The Dual Alliance & Entente Cordiale
In 1882 a Triple Alliance was established between Germany, Austria-Hungary and Italy. This left the Russians feeling vulnerable and the French, still nursing their wounds after their defeat in the Franco-Prussian war of 1871, diplomatically isolated.
Meanwhile, having dismissed Otto Von Bismarck, the new German Emperor Wilhelm II allowed the secret Reinsurance Treaty with Russia to expire in 1890, despite Russian requests to renew it.
The answer for both France and Russia was a Dual Alliance in which Russia would gain cheap loans from the Paris Bourse to help rebuild deficits in their army and to build strategic railways that could bring troops to the German front.

How the European Powers lined-up in 19014 with Germany sandwiched between France & Russia
After extensive negotiations, the Franco-Russian alliance was agreed in August 1892 and stipulated that if one of the countries of the Triple Alliance (Germany, Austria-Hungary or Italy) attacked either France or Russia, its ally would attack the aggressor in question.
This treaty is by no means the cause but is a crucial step towards the First World War because most treaties aim to solve conflicts of interest between countries whereas the Franco-Russian alliance was effectively an alliance directed against another country, most notably Germany.
To this was added the Entente Cordiale, a written and partly secret agreement signed in London between France and Britain on 8 April 1904.
The agreement was a change for both countries (even thought there had been an earlier Entente Cordial between them in 1843) due to:
- France remaining isolated from other European powers because Germany wished to estrange them from potential allies to prevent them from seeking revenge for their defeat in the Franco-Prussian War of 1870–71.
- Britain had maintained a policy of “splendid isolation” on the European continent only acting when protecting their interests and to maintain a balance of power on the continent. But their situation was changing; they had lost confidence during the Boer War and were becoming increasingly fearful of growing German aggression as was demonstrated in Dreadnought Arms Race between Britain and Germany during the first decade of the 20th Century.
The Schlieffen Plan
So German military tacticians now found themselves with a grave concern: Germany could find themselves having to fight both France and Russia on two fronts and forcing them to divide their resources. Their strategic solution was put together in a Plan that aimed to knock out one of her antagonists quickly (the French), and then deal with the other (the Russians).
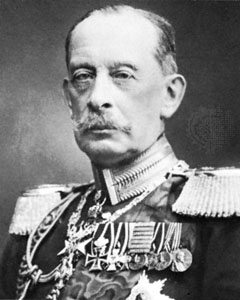
Field Marshall Alfred Von Schlieffem
This plan was called the Schlieffen Plan, a battle plan drawn up by German tacticians under their Chief-of-Staff, Field Marshall Count Von Schlieffen in which they planned for the defeat of France in just six weeks.
If hostilities did start, Germany expected France to concentrate its forces in the Alsace-Lorraine region along their border with Germany. So in the Schlieffen Plan, the idea was for Germany to attack France through Belgium but this could bring Britain into the conflict due to the Entente Cordial and the 1839 Treaty of London which guaranteed Belgium’s neutrality.
Therefore in the Schlieffen Plan, Germany prioritised the capture of the French and Belgium channel ports as quickly as possible in order to deny Britain easy access to the conflict. This became known as, “The Race to the Sea”.
Von Schlieffen died in 1912 and is supposed to have said on his death-bed, “Keep the right wing strong,” referring to the need to capture the channel ports as quickly as possible before surrounding the French army and capturing Paris on the way.
The Route to the Sea
And hence the importance of Ypres because, if held, it blocked the route of the German Army to the ports on much of the French and Belgian coast.
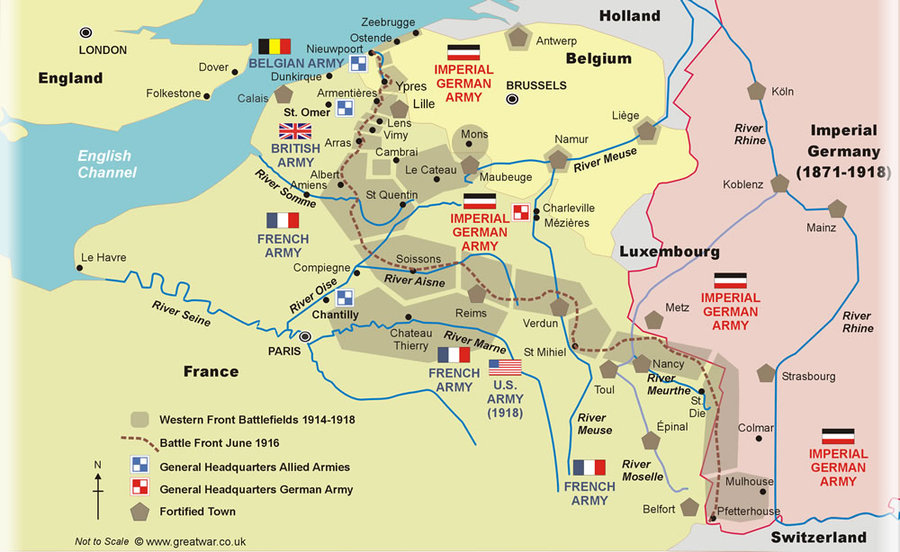
Map showing Ypres as the key to preventing the German army reaching the channel ports
Ypres occupies a strategic position at the centre of a road network that leads to the coast. (The defence of Ypres was also to become important because it eventually became the last major Belgian town that was not under German control.) Indeed the British Chief of the Imperial Staff, Field Marshal Sir William Robertson advised the British Government on 25 June 1915 against retreating to the Channel Ports, an option contemplated by the Cabinet after the defensive losses at the Second Battle of Ypres, arguing that, “It would leave the British ‘helpless spectators’ in France’s defeat”.
Ypres never did fall into German hands during the war. But according to British Official Military History, the danger of the Allied line being broken and rolled up at Ypres in October & November 1914 was “one of the most momentous and critical moments of the war, and only by the most desperate fighting did the Allies succeed in maintaining their front”.
Had they given ground at that stage, the whole of Belgian territory may well have been lost and the Germans would have reached Dunkirk & Calais and secured their objective.
It is arguable that had Britain (and other Commonwealth Countries) not entered the war, the German Schlieffen plan would quite likely have worked and France could well have been knocked out of the war as planned with a catastrophic effect on British sea communications which would have been to the detriment of Britain and its Empire.
From a British perspective the Ypres Salient was of outstanding importance. Today Ypres remains an attraction for British tourists who flock there in seemingly ever increasing numbers to learn about and pay homage to the losses that were so great one hundred years ago “In Flanders Fields”.
Map showing the Ypres Salient with the German lines, which occupied the higher ground, surrounding the town on three sides.
The Menin Gate
It is arguable that more men marched to their death through the Menin Gate than anywhere else on earth. British and Commonwealth soldiers passed through the Menin Gate on their way to the front lines where some 300,000 of them were killed in the Ypres Salient. Of these, 90,000 soldiers have no known graves.
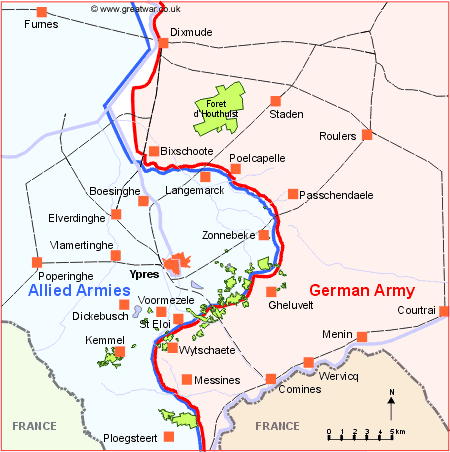
Out along the Menin Road to Hellfire Corner, the road became one of the most infamous and dangerous places for the British to move about on the Western Front. A crossroads and railway crossing about 2 kilometres due east of Ypres on the Menin Road became known as “Hellfire Corner” because the Germans, with a view from their positions on the ridge, shelled it constantly. The Menin Gate, the Menin Road and Hellfire Corner have become three names bound together in British Military History.
Hell Fire Corner in the Ypres Salient was under constant shell fire from the enemy
The Menin Gate War Memorial was built and opened in 1927. It commemorates the British soldiers whose bodies were never found. On its huge panels are carved 54,896 names of men with no known grave who died in this area between 1914 and August 1917. The designer thought there would be plenty of room for all the names, but there was not, so a further 34,984 names of missing soldiers (from August 1917 to the end of the war) are carved on panels at Tyne Cot Cemetery not far away.
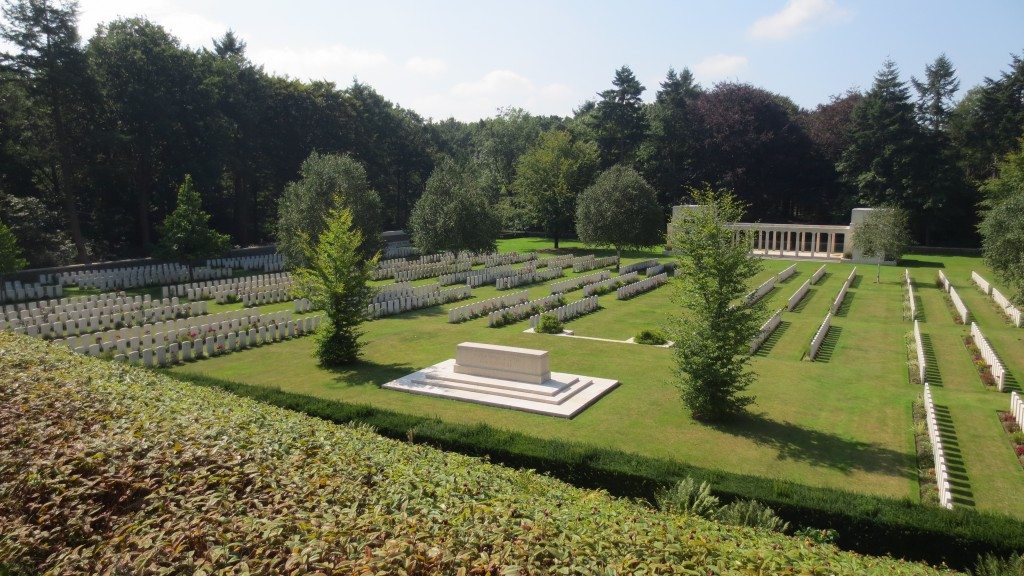
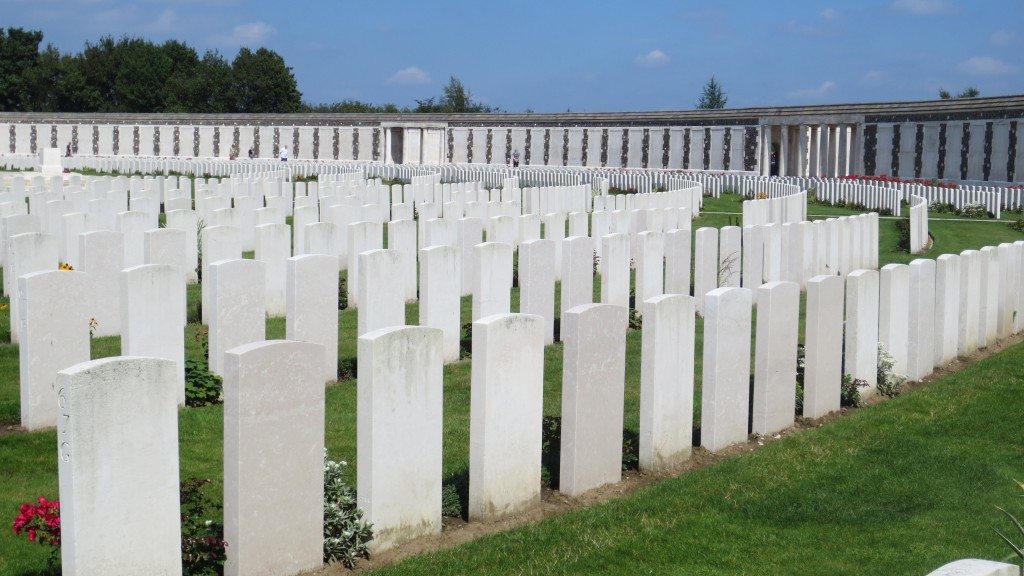
Tyne Cot Cemetery – the largest Commonwealth War Cemetery in the World is situated in the Ypres Salient
Hill 62
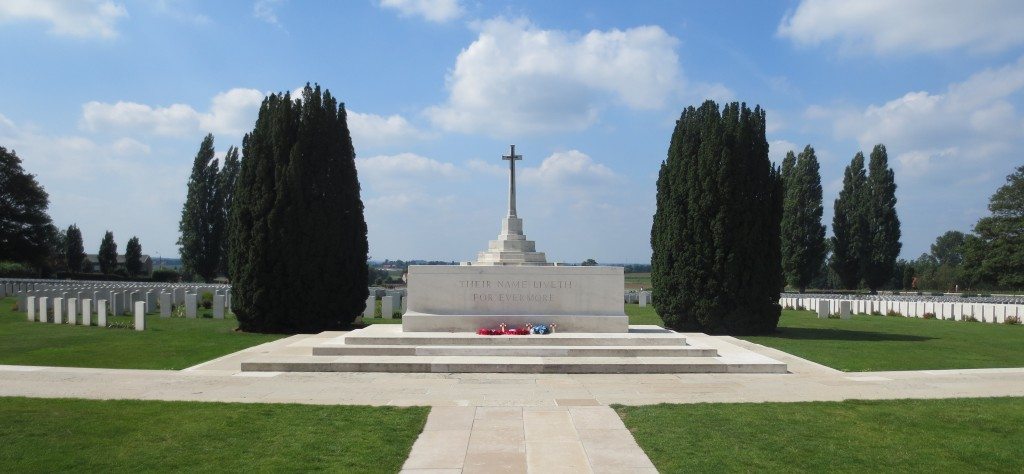
When the farmers and other civilians returned to the salient at the end of the war, one landowner decided to fence off an area containing British and Commonwealth trenches and to leave it untouched as a lasting memorial.
The name of this site is Hill 62, named from the identification given to it on allied military maps of the time. A visit here gives the visitor a clear understanding of the invidious and frightening position of the allies in their trenches which are in close proximity to the German trenches which, being on higher ground, overlooked them.
Preserved trenches at Hill 62 in the Ypres salient
The advantages of the rise in ground can be seen and understood when visiting these battlefields. Tyne Cot is a fine example as the Cemetery was built on a site occupied by two German Concrete Machine-gun Bunkers with a view across the open land as far as Ypres itself. Allied troops would have to have advanced straight into their withering fire when attacking this German-held position.
It is not only the crucial advantage of the view across the enemy’s positions and rear areas that gave the Germans an advantage but also in the daily life of their soldiers. Their positions were greatly preferable as they had better drainage being on higher ground which was important because the area of Belgian Flanders around Ypres is generally low-lying with a damp coastal climate; it has a heavy, waterlogged, clay-based soil,and it is in an area that is prone to flooding.
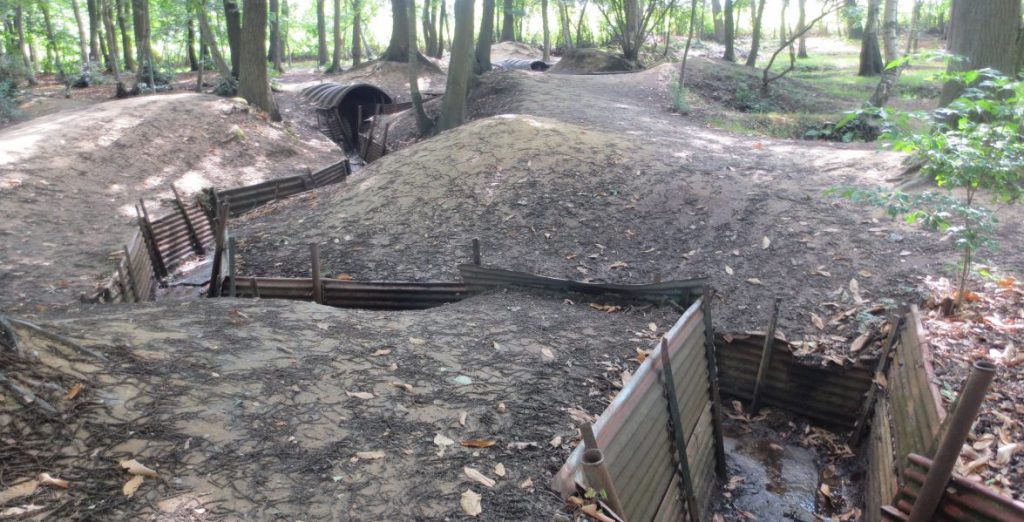
Images of Hill 62

Untouched trenches at Hill 62 in the Ypres salient
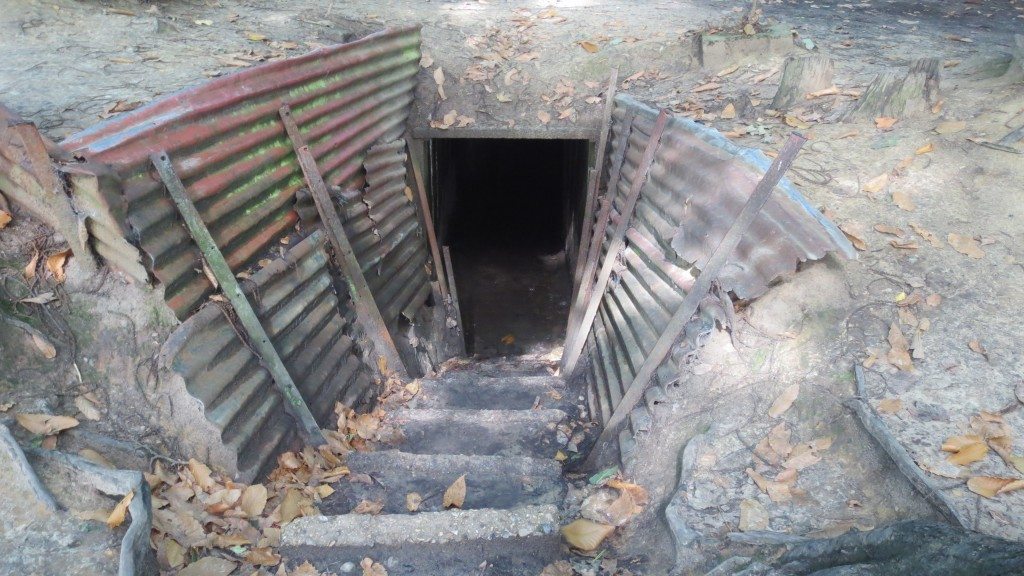
Tunnel dug into “No Man’s Land”

Shell holes still surround the trenches. Note the shattered remains of a tree
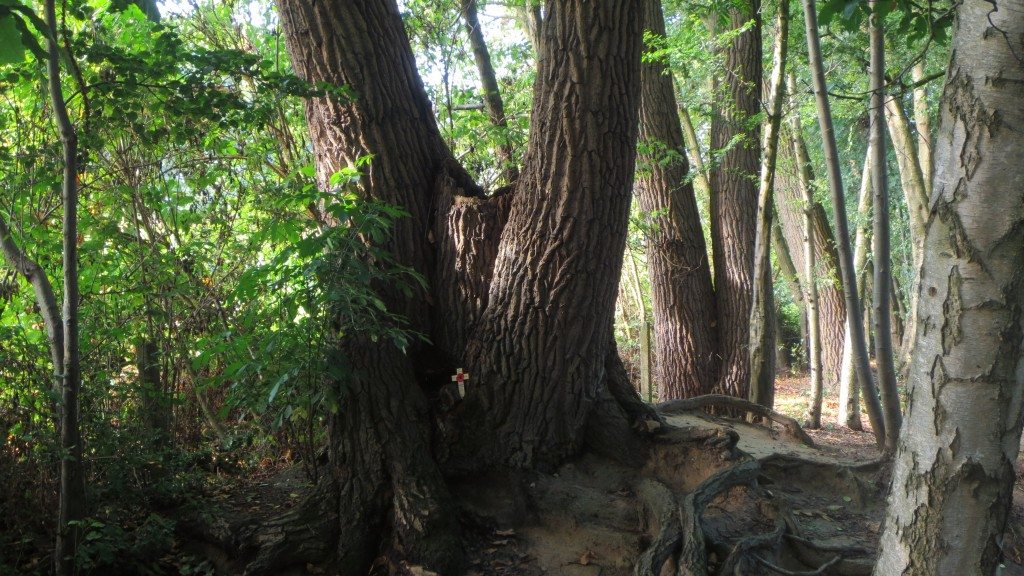
An oak tree, smashed by shell fire, has regrown on either side of the original stump
The site at Hill 62 demonstrates life in a trench when being overlooked by the enemy. Steel plates still exist that gave allied riflemen some protection when trying to return the enemy’s harassing fire; and three tunnels still exist showing how the allies had to resort in these circumstances to digging tunnels forward in order to reach a position where they could capture land by building a new network of trenches forward of their current position.
Award for Ypres
It is hardly surprising that at the end of the war, Ypres was awarded the Military Cross from Great Britain and the Croix de Guerre from France.
The Battles of the Ypres Salient
1914
7th Oct: Ypres occupied by the German Army.
12th Oct to 2nd Nov: Battle of Messines 1914
13th Oct: Germans driven out of Ypres and the surrounding area by Allied forces.
19th Oct to 22nd Nov: First Battle of Ypres
The First Battle of Ypres comprised three phases:
- 21st to 24th Oct: The Battle of Langemarck
- 29th to 31st Oct: The Battle of Gheluvelt
- 11th Nov: The Battle of Nonnebosschen
Critical day: 31st Oct: The British line is broken but restored.
1st Nov: Messines village captured by the Germans.
1915
17th April to 22nd April: The Battle for Hill 60
22nd Apr to 25th May: The Second Battle of Ypres
The Second Battle of Ypres comprised four phases:
- 22nd April to 23rd April: The Battle of Gravenstafel Ridge
- 24th April to 4th May: The Battle of St. Julien
- 8th May to 13th May: The Battle of Frezenberg Ridge
- 24th May to 25th May: The Battle of Bellewaerde Ridge
1916
2nd June to 14th June: The Battle for Mount Sorrel
1917
7th June to 14th June: The Battle of Messines 1917
31st July to 10th November: The Third Battle of Ypres (sometimes referred to as the Battle of Passchendaele)
The Phases of the Battle:
Phase One : July – August
- Battle of Pilckem Ridge
- Capture of Westhoek
- Battle of Hill 70
- Battle of Langemarck
- Subsidiary operations
- Second offensive battle of Verdun
Phase Two : September – October
- German defensive changes
- Battle of the Menin Road Ridge
- Counter-attack, 25 September
- Battle of Polygon Wood
Phase Three : October – November
- Battle of Broodseinde
- German defensive changes
- Battle of Poelcappelle
- First Battle of Passchendaele
- Battle of La Malmaison
- Second Battle of Passchendaele
1918
9th April to 29th April: The Fourth Battle of Ypres (aka Battles of the Lys)
The Fourth Battle of Ypres (Battles of the Lys) comprised 8 phases:
- 9th April to 29th April: Battle of Éstaires
- 10th April to 11th April1918: The Battle of Messines 1918
- 12th April to 15th April: The Battle of Hazebrouck
- 13th April to 15th April: The Battle of Bailleul
- 17th April to 19th April: The First Battle of Kemmel Ridge (aka First Battle of Kemmelberg)
- 18th April: The Battle of Bethune
- 25th April to 26th April: The Second Battle of the Kemmel Ridge
- 29th April: The Battle of the Scherpenberg
Critical point: 16th April: Passchendaele is reoccupied by German forces.
28th Sept to 2nd Oct: The Battle of Ypres 1918 (aka the Fifth Battle of Ypres)
Critical moments:
- 28th Sept: Messines is retaken by British forces.
- 29th Sept: Passchendaele is retaken by Allied forces.
From October onwards, the Allies advance to the east, pushing the German Army further away from Ypres and away from all the destruction left in the area from four years of fighting.
One of the many cemeteries for British & Commonwealth troops constructed on the site of a battlefield in the Ypres Salient
Tyne Cot Cemetary; the wall at the back contains the names of those that did not fit onto the Menin Gate Memorial